Sunday 14 July 2019

Fixing IntelliSense when using RazorMachine

The best thing about using Razor to generate server-side HTML is that you get full intellisense when writing your HTML files. The thing is, when you use RazorMachine in a console application, out of the box, I was getting intellisense errors.

There are a couple of things you need to do to fix these issues. They consist of altering the app.confg file and making sure a couple of ASP.NET DLL's are located in the bin directory

The code for this blog post can be found on Github here: OceanAirdrop/TestRazorMachineHTMLTemplate

Unload & then Reload project to see changes

The first thing to know, when making changes to the app.config files is that, to see the changes you have made you need to unload and reload the project.

Once you have unloaded your project, to reload you can select the "Reload Project" option:

If you don't reload the project you won't see the changes. It's either that or restart visual studio!!

Problem 1 - Fixing 'implicitly typed local variable' error CS8023

If you use the var keyword in your cshtml:

then you might see errors like this:

To fix that, and other errors, we need to add the following to the section to the app.config file

The actual snip that should be copied and pasted into the app.config file is as follows:

<system.web>
  <compilation debug="true" targetFramework="4.5">
    <assemblies>
      <add assembly="System.Core, Version=4.0.0.0, Culture=neutral, PublicKeyToken=b77a5c561934e089" />
      <add assembly="System.Data, Version=4.0.0.0, Culture=neutral, PublicKeyToken=b77a5c561934e089" />
      <add assembly="Microsoft.CSharp, Version=4.0.0.0, Culture=neutral, PublicKeyToken=b03f5f7f11d50a3a" />
      <add assembly="System.Web.Helpers, Version=3.0.0.0, Culture=neutral, PublicKeyToken=31BF3856AD364E35" />
      <add assembly="System.Web.WebPages, Version=3.0.0.0, Culture=neutral, PublicKeyToken=31BF3856AD364E35" />
      <add assembly="System.Web.Mvc, Version=5.2.3.0, Culture=neutral, PublicKeyToken=31BF3856AD364E35" />
      <add assembly="System.Data.Linq, Version=4.0.0.0, Culture=neutral, PublicKeyToken=b77a5c561934e089" />
    </assemblies>
  </compilation>
  <pages>
    <namespaces>
      <add namespace="System.Web.Helpers" />
      <add namespace="System.Web.Mvc" />
      <add namespace="System.Web.Mvc.Ajax" />
      <add namespace="System.Web.Mvc.Html" />
      <add namespace="System.Web.Routing" />
      <add namespace="System.Web.WebPages" />
    </namespaces>
  </pages>
</system.web>

Problem 2 - Fixing missing Helpers, WebPages errors CS0234

In a console application, by default we do not have access to the ASP.NET DLLs that are expected by Razor so we will see the following errors in the "Errors List" window

To fix these issues you need to make sure you have got the 'Microsoft.AspNet.Mvc' nuget package installed on your project. This will bring along a couple of dependencies with it.

That will give you the necessary DLLs that Razor depends on.

Now, it should be noted that you only need these nuget packages so that you can copy the following DLLs to the root Bin directory.

  • System.Web.Helpers.dll
  • System.Web.Mvc.dll
  • System.Web.WebPages.dll

After you have these DLLs you could remove the nuget packages Microsoft.AspNet.Mvc and Microsoft.AspNet.WebPages.

Problem 3 - Copying DLLs to root of Bin directory

Now, even with the necessary DLL's you will still see intelisense errors. It turns out because razor is a ASP.NET web component it expects the DLLs to be in the root of the Bin directory and not the Bin\Debug or Bin\Release directory.

So if your directory looks like this:

...you need to copy the following DLLs to the root of the bin directory

For my test project, I setup a batch file that world run as a post-build event

and make sure you call the batch file runs on every build

Another way of doing this would be to copy the following DLLs to a 3rdParty directory and modify the batch file to copy these to the root Bin directory on every build.

  • System.Web.Helpers.dll
  • System.Web.Mvc.dll
  • System.Web.WebPages.dll

That way, you are not taking a dependency on extra DLLs that you are not using.

Problem 4 - Adding DLLs

I had another problem that my console app was using a seperate DLL in my project. Razor pages couldnt find the types to provide intellisense and the "Error List" window gives you errors like: The type 'StarWarsCharacter' is defined in an assembly that is not referenced.

To fix errors like this, you need to add the DLLs to the assemblies section of the app.config file.

Code

I have a sample project on Github that can be found here: OceanAirdrop/TestRazorMachineHTMLTemplate


That's it!

With those couple of changes in place in the console project, we get full intellisense (with no errors!) when editing cshtml razor files. Yay!


Contact Me:  ocean.airdrop@gmail.com

Thursday 4 April 2019

Passing data into a SQL Trigger

Okay, that title is a BIG fat lie! - You can't actually pass data to a trigger!

But, I had a need to simulate the passing of data! - You see I had a trigger that performed some audit logging when data was changed and wanted to tie this event up with other events that had happened, external to the trigger.

The scenario went something like this:

  1. - There is code running in C# land that triggers an update statement in the database.
  2. - The update statement fires a trigger which writes data to another table.
  3. - The C# code continues and also writes some data to another table.

The problem I had, was how do I link these 3 events together? What I would like to do is generate an id in step 1 and then pass that id to the trigger to use but you can't do that.

...Well, not explicitly!

SQL Magic Glue

So after researching on the interweb, I found out that the SQL magic glue i needed was CONTEXT_INFO. You can read all about it here:

You can basically think of it as a per session cookie.. That means applications can set it and then retrieve it again later on.. Basically perfect for my trigger problem.

Abridged Version

Basically, the abridged version is something like this. In C# land, first, we generate a an id. I am using a GUID..

-- Step 01: Generate a guid
public void SomeFunction()
{
   // Let's create a log guid in C# land that we can use to associate events in different tables
   var logGuid = Guid.NewGuid();
}

...Or if you are doing it on the database:

-- Step 01: Generate a guid
declare @logGuid uniqueidentifier = (select NEWID());
print @logGuid 

Then, take that unique id and save it to the context info for our db connection..

-- Step 02: Set The Guid as this sessions context info
DECLARE @ContextInfo varbinary(100);
SET @ContextInfo = cast(@logGuid as varbinary(100));
SET CONTEXT_INFO @ContextInfo;

If your doing that in C# land you will be executing the above sql using the normal SqlConnection class. This is effectively injecting the GUID for this particular SQL connection, that the trigger can pick up and use.

Now, we need to alter the audit trail triggers like this:

ALTER TRIGGER [schema].[tr_audit_table_name] ON [schema].[update]
AFTER UPDATE, DELETE AS
BEGIN
       
    -- Get The @logGuid Guid from the session context 
    DECLARE @logGuid uniqueidentifier = CAST(CONTEXT_INFO() as uniqueidentifier);

    PRINT @logGuid 
    
    -- Now you can use this guid and save it to the db along with any other 
    -- insert/update statements you make here

    update [database].[schama].[other_table] set some_column = 'update from trigger', log_guid = @logGuid
    where some_id = 14
...

Now, back in C# land when you perform the the update statement:

update [database].[schama].[table_name] set some_column = 'wibble-wobble', log_guid = '@logGuid' where some_id = 14

The trigger will fire and will grab GUID that we associated with the C# sql connection! That GUID was setup outside the trigger but the trigger was able to access it and use it.

Wrap Up

Now that's what I call noice!...


Contact Me:  ocean.airdrop@gmail.com

Sunday 31 March 2019

RazorMachine HTML Templating Library

The other day, I needed a HTML templating library for C#. I was writing a service which sends out reports and wanted the contents to be formatted HTML. Basically, I was looking for {{ mustache }} style templates similar to JavaScript's handlebars.

As it happens there is a port of of mustache for C# called, wait for it....... Nustache! 🙂 (Gotta love that name!).

But, as with all these things the power Google led me to find out what else was out there. As it turns out there are a number of good tempting libraries for C# including:.

Microsoft Razor

I initially was settling on using DotLiquid until I remembered Microsoft's Razor Pages! They are front and center in the new ASP.NET Core world and Blazor (the experimental C# WebAssembly framework) also uses them.

The great thing about Microsoft's Razor pages is that they easily allow you to mix and layout C# model objects alongside HTML. Visual Studio gives you syntax highlighting and code completion of your C# objects and on top of all that you can add C# if and loop statements to control flow. Its a nice templating library with great IDE support. All you need to do is rename the .html file to .cshtml!

Here's a quick example of Razor syntax:

<h1>Your Action is @modelObj.ActionType </h1>
<p>Some text goes here </p>

@if (!string.IsNullOrEmpty(modelObj.Name))
{
   <p>Hello @modelObj.Name! </p>
}

<ul>
   @foreach(var favItem in modelObj.FavouriteList)
   {
     <li>@favItem.Name ( @favItem.Description )  </li>
   }
</ul>

<h3>Thats all folks!</h3>

But I didn't know if it was possible to use Razor in a simple C# console application, outside of ASP.Net. After turning back to Google, I found a plethora of libraries out there including:

The list goes on and on, but the two which looked the most promising was RazorEngine and RazorMachine. RazorEngine is the most popular however, for my purposes I went with RazorMachine because it does not produce temporary files (as RazorEngine does).

Helper Class

Using RazorMachine, I knocked up this helper class to help with reading and converting of my cshtml project files

public class RazorView
{
    private static RazorMachine m_razorMachine = null;
    public string TemplateName { get; set; }
    public object Model { get; set; }

    public RazorView(string templateName, object model)
    {
        TemplateName = templateName;
        Model = model;
        Initialise();
    }

    public static void Initialise()
    {
        if (m_razorMachine == null)
            m_razorMachine = new RazorMachine();
    }

    public string Run()
    {
        string content = null;

        if (!string.IsNullOrEmpty(TemplateName))
        {
            var htmlTemplate = ReadTemplate(TemplateName);
            content = m_razorMachine.ExecuteContent(htmlTemplate, Model).Result;
        }

        return content;
    }

    private string ReadTemplate(string fileName)
    {
        string rptTemplate = string.Format(@"{0}\Views\{1}", 
                AppDomain.CurrentDomain.BaseDirectory, fileName);

        if (!File.Exists(rptTemplate))
            return "";

        var htmlTemplate = System.IO.File.ReadAllText(rptTemplate);

        return htmlTemplate;
    }
}

With the above class we can then use it as follows:

Person modelObj = new Person();
modelObj.FirstName = "Bart";
modelObj.LastName = "Simpson";

string htmlContent = new RazorView("Test.cshtml", modelObj).Run();

Wrap Up

That's about the long and short of it. I have put a sample project on my github account here https://github.com/OceanAirdrop

free hit counter
Contact Me:  ocean.airdrop@gmail.com

Sunday 3 February 2019

OWIN WebAPI with Self Signed HTTPS

I recently wondered what would be involved in setting up a self signed HTTPS certificate to use with an internal WebAPI OWIN service that listens on a specific port number. Due to the interesting problems that cropped up as I went through the steps needed, I thought I would write them up as a reminder for myself in the future.

As we know, all services should allow you to connect to them over HTTPS if you are transferring over sensitive data (think passwords, etc). If you are in a situation where you are writing many local services, instead of adding every self-signed certificate you create to the trusted root store, a better alternative is to create your own root CA certificate.

This root CA certificate authority should be installed into the trusted store of the machine. What does this give us? Well, this way, each service would have a certificate of its own that is created/signed from our root CA certificate and because we have trusted the root cert all other certificates made from it will be automatically trusted (This is the chain of trust).

MakeCert

Now if you have created any certificates in the past you will have certainly come across the Windows makecert command. To create a CA certificate with this utility is pretty straightforward.

makecert.exe -r -n "CN=OceanAirdropCA" -pe -sv OceanAirdropCA.pvk -a sha512 -len 4096 -b 01/01/2019 -e 01/01/2040 -cy authority OceanAirdropCA.cer
pvk2pfx.exe -pvk OceanAirdropCA.pvk -spc OceanAirdropCA.cer -pfx OceanAirdropCA.pfx
pause

Then, later on when you want to generate client certificates from this CA cert, again, its pretty simple:

makecert.exe -iv OceanAirdropCA.pvk -ic OceanAirdropCA.cer -n "CN=OceanAirdropClient" -pe -sv OceanAirdropClient.pvk -a sha512 -len 4096 -b 01/01/2019 -e 01/01/2040 -sky exchange OceanAirdropClient.cer -eku 1.3.6.1.5.5.7.3.1
pvk2pfx.exe -pvk OceanAirdropClient.pvk -spc OceanAirdropClient.cer -pfx OceanAirdropClient.pfx

But the problem with the MakeCert utility is that its as old as gods dog and turns out that it doesn't populate certain fields needed to be validated by Chrome. Here's the error chrome gives you:

If you go to chrome it tells you that this certificate is not secure. This is because since chrome 58, you have to specify a subjectAltName as part of the certificate. But the makecert command does not allow you to generate a "Subject Alternative Name".

Using PowerShell to create our CA certificate

There are a couple of alternatives we could use to create the certs.. Either OpenSSL or Powershell.. This stack overflow post nicely explains how to create a self-signed cert using OpenSSL, but I opted to go the Powershell route.

Here's what to do. First start Powershell as administrator and issue each of the following commands in order:

// Step 01: Setup params for new self signed cert. Notice that the key usage can 'CertSign'
$params = @{
  DnsName = "OceanAirdrop.com CA"
  KeyLength = 2048
  KeyAlgorithm = 'RSA'
  HashAlgorithm = 'SHA256'
  KeyExportPolicy = 'Exportable'
  NotAfter = (Get-Date).AddYears(10)
  CertStoreLocation = 'Cert:\LocalMachine\My'
  KeyUsage = 'CertSign','CRLSign' 
}

// Step 02: Actually create our CA cert and store it in the variable $rootCA
$rootCA = New-SelfSignedCertificate @params

// Step 03: Export the public CA key to file
Export-Certificate -Cert $rootCA -FilePath "C:\certs\OceanAirdropRootCA.crt"

// Step 04: Export the public/private key to file (as pfx file)
Export-PfxCertificate -Cert $rootCA -FilePath 'C:\certs\OceanAirdropRootCA.pfx' -Password (ConvertTo-SecureString -AsPlainText 'securepw' -Force)

The above commands first create a root CA certificate named OceanAirdropRootCA. It then exports the certificate to disk in both the .crt and .pfx file formats.

Now we have a root CA certificate, ho-ho-ho!

But, notice in the above picture, this certificate is not trusted on my machine.. That's because it needs to be installed into the root certificate store. So lets install the root CA key that this client key was generated from into the computers trusted certificate store.

I have found that you can type the command "certmgr.msc" from the start menu to access the certificates on your machine BUT by default it only shows your your personal certificates, but we want to install our certificate at the machine level.

So, to install the certificate type "mmc" from the start menu to bring up the mmc snap-in. Then click File->"Add/Remove Snap-In" where you will be presented with this dialog. Select Certificates and press "Add". From here, this will give you the option to select "Computer Account".

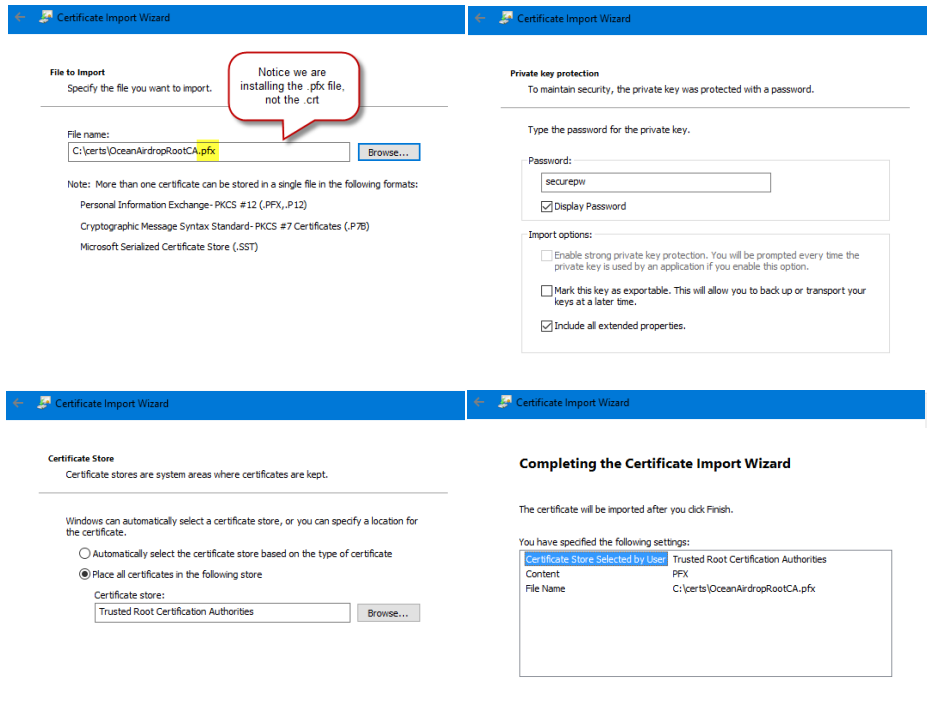
In the Trusted Root Certification Auuthorities, right click on the Certificate folder then select Import:

Then go through the wizard process:

Now, when we inspect our root certificate we can see that it is now trusted:

Using PowerShell to create a client certificate

At this point we have a root CA certificate that we can start using to mint/sign new client certificates. These client certs will be used by our OWIN services.

Again, open up Powershell and run through the following commands:

// Now at some point later on you might want to create another certificate that is signed by your CA key

// Step 05: First lets load the CA key from disk into the variable $rootCA
$rootCA = Get-PfxCertificate -FilePath "C:\certs\OceanAirdropRootCA.crt"

// Step 06: Setup params for new self signed cert.
$params = @{
  Signer = $rootCA
  KeyLength = 2048
  KeyAlgorithm = 'RSA'
  HashAlgorithm = 'SHA256'
  KeyExportPolicy = 'Exportable'
  NotAfter = (Get-date).AddYears(2)
  CertStoreLocation = 'Cert:\LocalMachine\My'
}

// Step 07: Actually create cert and store in variable: $appCert1
$appCert1 = New-SelfSignedCertificate @params -Subject *.my.domain -DnsName my.domain, *.my.domain

// Step 08: Export the keys to file to store securlly
Export-Certificate -Cert $appCert1 -FilePath "C:\certs\appCert1.crt"
Export-PfxCertificate -Cert $appCert1 -FilePath 'C:\certs\appCert1.pfx' -Password (ConvertTo-SecureString -AsPlainText 'securepw' -Force)

When creating a client certificate, the majority of times the root ca, key length and expiry date hardly ever change... But the common name and DNS names do.. So below I declare some of the options that don't change for New-SelfSignedCertificate in a variable names "params". Then on the call to New-SelfSignedCertificate I speciffy the -Subject and -DnsName fields on the command line. Here's me running through those commands:

This produces a certificate that looks like this:

Notice that the Subject Alternative names are now correctly populated.

Registering the port with windows

Okay, at this point, we have created our certificates.. And I assume we have a WebAPI service running and listening on a particular port number. For us to use our client certificate, we need to register the port with windows, then bind the certificate to the service. Here's how to do that.

My service is going to be listening on port 9000 for https traffic.. Open up a command prompt and issue the following command:

netsh http add urlacl url=http://+:9000/ user=everyone

If at a later date you need to delete the reservation (as I did in testing) you can use this command:

netsh http delete urlacl http://+:9000/

// If you want to show a list of bindings:
netsh http show urlacl >c:\bindings.txt
start notepad c:\bindings.txt

Binding the certificate to the service

At this point, we have the client certificate in the machine and have registered our listening port with windows. The next thing we need to do is run a command to bind our new SSL certificate to our application port (9000).

netsh http add sslcert ipport=0.0.0.0:{{port} certhash={{thumbprint}} appid={{app-guid}}

There are three variables we need to plug into this command. The port number (which is 9000 in our case), the certifcate thumbprint and a guid. You can pick up the thumb print of the certificate from here (you just need to remove all the spaces from the string):

For the guid, you can either generate a random guid or you can pick up the application guid from your visual studio project:

Once you have got those 3 pieces of information, you would issue the command as below

If you are playing around a bit, at some point you will want to delete the binding. To delete a SSL certificate from a port number use the following command:

netsh http delete sslcert ipport=0.0.0.0:9000

Opening ports on the firewall

If you intend to access this service from another machine make sure you open the port in the windows firewall.. You can do this from the command line using these commands:

netsh advfirewall firewall add rule name="OceanAirdop_Svc_9000" dir=in action=allow protocol=TCP localport=9000
netsh advfirewall firewall add rule name="OceanAirdop_Svc_9000" dir=out action=allow protocol=TCP localport=9000

Back to the code

Now, if we jump back to our code, all we need to do is alter the base address from http to the new https

static void Main(string[] args)
{
    try
    {
        string baseAddress = "https://L-03067:9000/";

        // Start OWIN host 
        using (WebApp.Start(url: baseAddress))
        {
            Console.ReadLine();
        }
    }
    catch (Exception ex)
    {
    }
}

Now when we visit the endpoint over http all works as intended!


WebAPI Exceptions

Okay, it wasn't all plain sailing... I encountered these exceptions along the way which may raise their heads.. If they do, here are the solutions

WebAPI Exceptions - Failed to listen on prefix

If, when you run your code, you get the following error: "Failed to listen on prefix"....

...check to make sure you have registered the correct http scheme. So it should be netsh http add urlacl url=https://+:9000/ user=everyone (notice the s) and not: netsh http add urlacl url=http://+:9000/ user=everyone

WebAPI Exceptions - Access Denied Exception

If you are debugging your service and get an "Access Denied" error back like this, make sure you start Visual Studio in Administrator mode.

You can do a quick check by looking at the title bar of Visual Studio. It should say (Administrator)

Wrap up!

Thats it... I can now visit my WebAPI service over https using a self-signed certificate!

website counters
Contact Me:  ocean.airdrop@gmail.com

Popular Posts

Recent Posts

Unordered List

Text Widget

Pages